Privacy is hard
If you are concerned about your privacy, and happen to have access to ProtonVPN‘s beta test and are using a pfsense firewall as router, then this might be in your interest.
The rough how to is not intended as a step-by-step howto, and I assume you have a little more than basic knowledge of networking, so not all of the steps will be demonstrated with screenshots. It might be applied to other firewalls (which give you similar options) as well, but that is not detailed.
Disclaimer: I am not affiliated in any way with ProtonVPN, ProtonMail or pfsense, other than using their services with a paid account. This blog entry is a review of my first impressions after a “hackfull” evening, playing around and learning a lot about pfsense as well (Linux as a secure firewall got shaky lately).
Know your threats!
Why do you actually need a VPN?
Why do you need a VPN in the first place? Who/what are you going against? Do you need to fake the Country you want to appear in, or is your life depending on it? Remember, the path to your browser does not matter if you have a cookie in your Browser that tells them who you are.
Having VPN is a nice thing, but it only keeps your ISP out of the loop, ALL the websites tracking you will still keep tracking you, just like they did yesterday without a VPN.
Decide which VPN provider you trust!
Jurisdiction
Trust is something that has to be earned, but initially you need a basis on which you can start. A good thing to look up is where the company’s seat is located in, since for example not so long ago a court in the US ruled that Google has to hand over information that is in its posession, but physically not in the country, so take your time to research these things.
Research the technology and the security they are providing
Are they using up-to-date technology? Forget PPTP, it is just a joke about security. Also a lot of providers’ Settings pages or How to’s are like someone googled about VPN and copy-pasted together something from 2003, where MD5 and PSKs were still valid setups. If you see “our own crypto”, better Ctrl+W that Tab ASAP.
Decide what traffic to run through your VPN tunnel.
How important is it for you to run ALL traffic through the VPN Tunnel? Is it worth to not run some dedicated traffic through the VPN? VOIP for example is quite sensitive to latency, and forcing it over a VPN jump could distort the voice quality dramatically.
How about always-encrypted traffic that is always authenticated and tracked anyway? The VPN Tunnel does (almost certainly) not provide you the same bandwidth as your native speed is. Talking about streaming providers like Netflix or similar: is streaming your movies worth having it streamed over a VPN? Yes is still a valid answer, but keep the question in mind.
Another important question is if your internet should go black if the VPN tunnel is down, or do you want to fall back to your default, un-VPN-ed gateway until the connection can be re-established? Ask your wife / your husband as well :-), she/he might have a strong opinion about not having internet during the day. If it’s so important, do not rely on one sole provider but use multiple ones!
ProtonVPN
Get an account
You need access to the closed beta, which is available for Visionary and Plus customers of ProtonMail, or have to wait until it will be available to the public (?), which is currently advertised as “Coming in Spring 2017”.
For those having access to it, there should be a new icon in Settings, just right below “Keys”, which takes you to a page where you can generate a random username and set a new password for it.

Get the config
They have also a fancy Windows Download-Next-Next-Finish clicky-bunty Native-Client, which can be used directly with your ProtonMail login credentials, and the random username and dedicated password are only required if you plan to use a third-party client, like openvpn.
Well, for native OpenVPN clients they actually provide a downloadable zipped collection of .ovpn files, which we will make use of to set up our pfsense. You can find them on their support page for linux at Additional resources.
The Security in a nutshell
The quality of a VPN Provider can be more or less measured by the technical aspects of how to configure the Tunnel, what crypto it uses and how much bandwidth / latency you need to sacrifice. ProtonVPN uses up-to-date settings, let’s have a quick look at them.
The crypto cipher being used is AES-256-CBC with a HMAC of SHA512, so not the old SHA1 with AES-128 that you tend to see. They also include a 2k static key for tls-auth the packages.
Embedded there is a CA to authenticate the remote side. which was issued by “C=CH, O=ProtonVPN AG, CN=ProtonVPN Root CA” and is a 4k RSA key with SHA-512 signature, which is currently considered “secure”.
All connections use the standard udp/1194 port, so in situations where this outgoing port is filtered, you might hit it’s limits. Some captive portals or firewalls (like at airports) let udp/53 pass without auth and/or are limiting outgoing ports to tcp80/443 even after logged in, so having a listener on those might also be worth to think about…
Secure Core
ProtonVPN presents a feature that is called “Secure Core“. This consist of Servers located either in Sweden or Iceland, but have a second hop at an endpoint in a different location, and your data travels like You->Sweden->France, so your public IP is in a different country than your VPN Server you connect to.

This is quite good for privacy, but relatively bad for latency: it adds about +100ms to +500ms, which has to be considered when choosing a permanent tunnel for a fixed location.
The speedtest with the Secure Core was “acceptable”, my 50/10MBit line measured around 39/6MBit throughput and a latency of +120ms totaling around ~125ms.

Configure pfsense
The current setup will show a random Japanese server being used with one dedicated IP net being routed through the VPN (accessing my workplace’s VPN should be routed directly).
The pfsense box itself is running on a 3-NIC APU2 Board from PC Engines, which has 4core / 4GB RAM with AES-NI in CPU, so it should handle this burden with ease. At the time of writing the latest version was 2.3.3-RELEASE-p1 [I updated to 2.3.4 during writing the blog entry].
Open the .ovpn config file for your favorite VPN Tunnel and keep it within reach, you’ll need it for a lot of copy+paste work.
Import RootCA
First of all, we need to import the ProtonVPN RootCA, so get to:
System => Certificate Manager => CAs => + Add
For the Name, enter something that you know of what this is, using “ProtonVPN RootCA” is probably the best approach for this.
On “Method” you can keep the default of “Import an existing CA“.
The “Certificate Data” Field is where the content of the <ca> … </ca> section goes, including the lines with the many dashes and BEGIN/END CERTIFICATE.
After saving you should have an entry back at CA’s showing you a self-signed certificate like this:
O=ProtonVPN AG, CN=ProtonVPN Root CA, C=CH
Valid From: Wed, 15 Feb 2017 15:38:00 +0100
Valid Until: Mon, 15 Feb 2027 15:38:00 +0100
New OpenVPN Client
Go and create a new OpenVPN Client connection at:
VPN => OpenVPN => Clients => + Add
Now simply follow the fields and use your copy+paste foo:
General Information
Server host or address => IP on "remote" line in .ovpn
Server Port => Keep in on 1194 (or whatever is after the upper IP)
User authentication settings
Username => Random-Generated Username from ProtonMail GUI
Password => Password for Username
Cryptographic Settings
Automatically generate a shared TLS authentication key => uncheck
Key => Paste value from <tls-auth> .. </tls-auth>, excluding comment with #
Peer Certificate Authority => Choose the RootCA we set up earlier
Encryption Algorithm => Choose AES-256-CBC (or whatever is at line "cipher")
Auth digest algorithm => Choose SHA-512 (512 bit) (or whatever is on line "auth")
Tunnel Settings
Compression => Enabled with Adaptive Compression
Don't pull routes => If you want to route ALL your traffic over VPN, keep it unckeced, otherwise check.
Advanced Configuration
Custom options => Add:
 remote-cert-tls server
 tun-mtu 1500
 tun-mtu-extra 32
 mssfix 1450
 fast-io
It should look like this at the end.
Now save it, it should connect automatically if not disabled with the very first checkbox. You can go and check it out on Status => OpenVPN. It should show “up” with a virtual IP address in the 10.8.8.0/24 IP Range:

All Your Traffic Are Belong To US
The most secure way
If you have chosen to route ALL your traffic over the VPN at the OpenVPN setup, you will need to add additional outgoing NAT rules for the OpenVPN interface, so go to:
Firewall => NAT => Outbound
Here you need to check the radio button telling “Manual Outbound NAT rule generation. (AON)“.
After that, select on each rule one-by-one the icon of “Add a new mapping based on this one” in the column of Action, and duplicate them with just changing the Interface to OpenVPN.
This is required because the remote server pushes routes that will change your routing table to go over their gateway via “redirect-gateway def1“, so you need to allow all traffic to being NAT-ed via OpenVPN.
This step is also nicely illustrated by PIA’s How to:
https://www.privateinternetaccess.com/pages/client-support/pfsense
We decide ourself what to send via VPN
If we chose not to pull the routes, we will need to get a little more configuration and set up our own routing rules, since we don’t get the default routes pushed, but it makes much more fun 🙂
Add a new Interface
Interfaces => (assign)
Here we create a new interface for our OpenVPN connection we set up earlier. On the “Available network ports” line pick the ovpncX interface. This will create you an OPTX interface, depending on how many interfaces you already have.

Click on its name to open and edit it. Make sure to choose a Description that will match your setup, since after you got it used by a Gateway, pfsense does not allow you to change it. I have chosen PROTONVPN. Make sure to check “Block bogon networks” but do not check to block private Addresses, since the VPN has a subnet of 10/8, which would be blocked otherwise.
Click here to see the whole page. After saving, you should see the new interface being show in the Interfaces drop down menu.
Add a new gateway
Now we need to tell pfsense what traffic we want to use the VPN. For that, we need to defined the PROTONVPN interface we just created as a Gateway, that can be used to send traffic towards The Internet. Just navigate to:
System => Routing
You should see the PROTONVPN_VPNV4 and PROTONVPN_VPNV6 gateways created by default. I have chosen to customize them and set up a ping monitoring against Google’s DNS Server 8.8.4.4, and have tuned the ping times higher to compensate with possible reconnects and latency introduces by some of the remote vpn servers. You can see the whole config page here.
Depending on if you want to have more VPN tunnels set up to load-balance your traffic, or if you want your Internet not go black if the tunnel is down, you will need to create a Gateway Group. You can skip this part and pay attention at the Firewall rules if you want all your traffic to pass through the tunnel.
I have chosen my traffic to fallback to the default Gateway if the VPN is not available, so you have to add the PROTONVPN with Tier 1 and the WAN with Tier 2, and keep the rest unchanged.

We have created the Gateway called “VPN“, which uses the ProtonVPN Tunnel, but if that is not reachable, falls back to the default WAN route. This is good to have your wife not call you during the day if the VPN tunnel goes down for maintenance 🙂
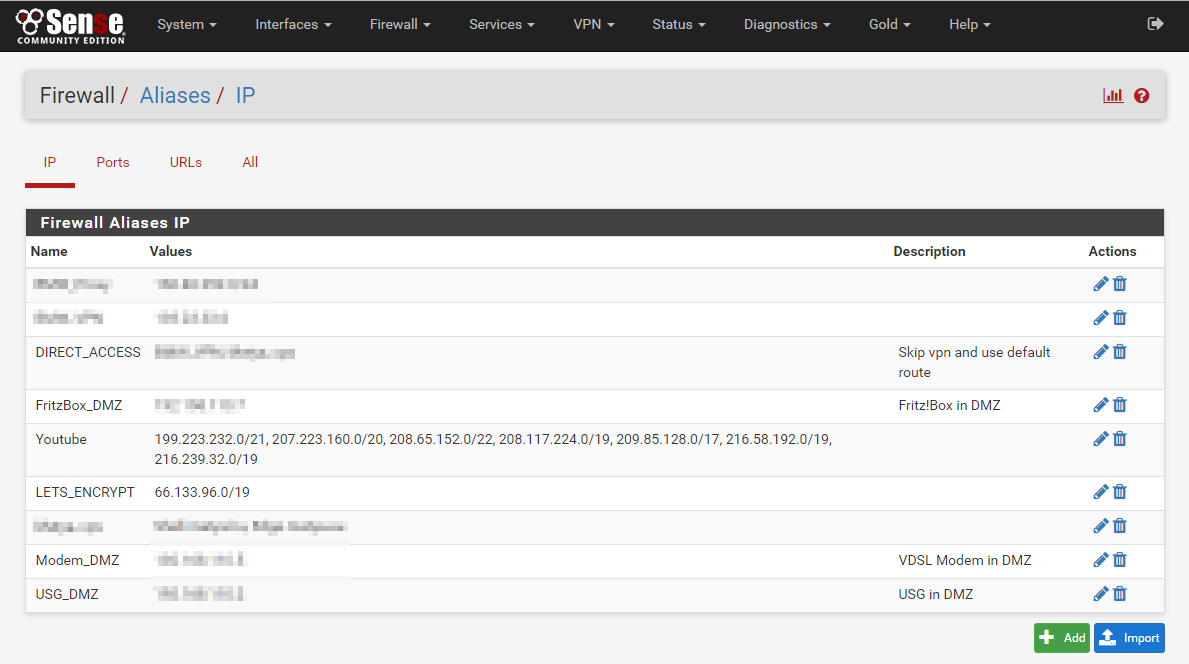
IP Aliases
Firewall => Aliases
I personally utilize the Aliases of pfsense, which comes handy to define destinations like WORK_VPN or YOUTUBE or NETFLIX, for which you can find IP subnets after some searching. Later I bundle them together in a DIRECT_ACCESS alias, which holds the separate entries, so I don’t have to touch the NAT Rules after editing this list.
NAT Rules
Firewall => NAT => Outbound
Here we need to change “Automatic outbound NAT rule generation” to “Manual Outbound NAT rule generation” to get the freedom to reorder and edit the entries, so they make sense.
I have for VOIP Telephony a Fritz!Box, which is in my DMZ, but it is latency-sensitive, and needs a direct port NAT-SIP protocol is not that big of a mess, so that goes on top.
I have created three additional NAT rules, that define how the translation will happen if the package arrives from my home network (it’s represented by the USG_DMZ alias). The remaining are the default rules for the outgoing WAN packets, which have been generated by the automatic rule generation.

Firewall rules
This is the most challenging part, since you need to design your network routes now. We have set up the proper VPN Gateway with monitoring and fallback to the WAN gateway, defined how the packages need to behave if they are sent out via the PROTONVPN interface, now we only need to ensure the packages actually take the right interfaces on their path. Navigate to the proper interface where your Internet-facing traffic arrives to the pfsense box. For me, this is the DMZ interface, but for you it might be LAN.
Firewall => Rules => <Interface>
These rules are processed from top to bottom, and the first rule that applies is processed, and if none matches, default is to drop the package. In order to allow some dedicated traffic direct access bypassing our VPN Tunnel, we need first to create an entry that matches the destination we have defined in the DIRECT_ACCESS Alias. For the Source, you could choose LAN Net or the gateway your internet flows through, which in USG_DMZ for me. See here the whole config page
The next in the list should be a generic rule that catches all remaining traffic to go through the VPN gateway. To achieve this, we will need to open the Advanced options and scroll way down to Gateway, keeping everything else as it is. Here at Gateway you can choose either the PROTONVPN_VPNV4 for VPN-Only, or our Gateway Group called VPN for WAN fallback.

The whole settings page can be viewed here.
For all this to work, we need to make sure the ordering is correct, so first we add a specific rule, and below it on that catches all remaining traffic.

Fingers crossed
If everything went well, you only have to fire up your command line and run a traceroute against an address included and one not included in the DIRECT_ACCESS rule. You should see something like this if the traffic is flowing over the VPN:
Tracing route to japan.go.jp [202.32.211.142]
over a maximum of 30 hops:

 1   1 ms    1 ms    1 ms  192.168.1.1
 2 379 ms  408 ms  408 ms  10.8.8.1
 3 337 ms  338 ms  339 ms  169.254.192.75
 4 339 ms  372 ms  403 ms  ae12.dar02.tok02.networklayer.com [161.202.118.136]
 5 381 ms  397 ms  392 ms  ae9.bbr01.eq01.tok01.networklayer.com [50.97.19.134]
 6 374 ms  406 ms  409 ms  ae-20.r00.tokyjp03.jp.bb.gin.ntt.net [117.103.177.169]
 7   *     364 ms  408 ms  ae-14.r30.tokyjp05.jp.bb.gin.ntt.net [129.250.4.80]
 8 418 ms  409 ms  407 ms  ae-2.r03.tokyjp05.jp.bb.gin.ntt.net [129.250.3.33]
If you want to choose a different tunnel, just rewrite the IP on the OpenVPN Client settings, it will reconnect and no other changes have to be re-done.
Final words
I have tried to add multiple VPN Tunnels from ProtonVPN, but apparently they provide you with the same 10.8.8.0/24 IP Subnet, regardless of which VPN tunnel you use, so load balancing between them is currently not possible: having the same IP Subnet with the same Gateway IP of 10.8.8.1 is not something a router can handle.
One could add different VPN Providers and round-robin over the different gateways, but as for example Troy Hunt has also pointed out quite good in his long blogpost, putting all your (and family’s) traffic through a VPN does mean they know A LOT of information about you, even if most of it is encrypted.
So bottom line is, since there is actually no organization overseeing them, the VPN Provides can be initially measured by the technical implementation of their service, but in the very end, it’s the customer’s trust they have to earn by behaving like they care about security and privacy, how they react to events regarding their customers or themselves, and are not just shipping your IP Traffic from A to B.
Matya
The screenshots were taken with the Chrome Plugin “Full Page Photo Capture“


